Linux 经常提到的问题
- 如何安装XAMPP?
-
请选择您的Linux操作系统版本,32位或64位.
为安装程序更改权限
chmod 755 xampp-linux-*-installer.run运行安装程序
sudo ./xampp-linux-*-installer.runXAMPP安装完成,安装目录:/opt/lampp
- Does XAMPP include MySQL or MariaDB?
-
Since XAMPP 5.5.30 and 5.6.14, XAMPP ships MariaDB instead of MySQL. The commands and tools are the same for both.
- 如何启动XAMPP?
-
使用该命令启动XAMPP:
sudo /opt/lampp/lampp start现在你可以在屏幕上看到类似这样的东西:
Starting XAMPP 1.8.2...

          LAMPP: Starting Apache...

          LAMPP: Starting MySQL...

          LAMPP started.


          Ready. Apache and MySQL are running.
如果收到任何错误信息,请访问 %{社区} 寻求帮助。
同时注意有一个图形化的工具使你易于维护你的服务器。你可以通过下面这些命令起动此工具。
cd /opt/lampp

sudo ./manager-linux.run (or manager-linux-x64.run) - 如何停止运行XAMPP?
-
使用该命令停止运行XAMPP:
sudo /opt/lampp/lampp stop现在你可以在屏幕上看到类似这样的东西:
Stopping XAMPP 1.8.2...

          LAMPP: Stopping Apache...

          LAMPP: Stopping MySQL...

          LAMPP stopped.
如果收到任何错误信息,请访问 %{社区} 寻求帮助。
同时注意有一个图形化的工具使你易于起动或停止你的服务器。你可以通过下面这些命令起动此工具。
cd /opt/lampp

sudo ./manager-linux.run (or manager-linux-x64.run) - 我如何检查是否一切正常?
-
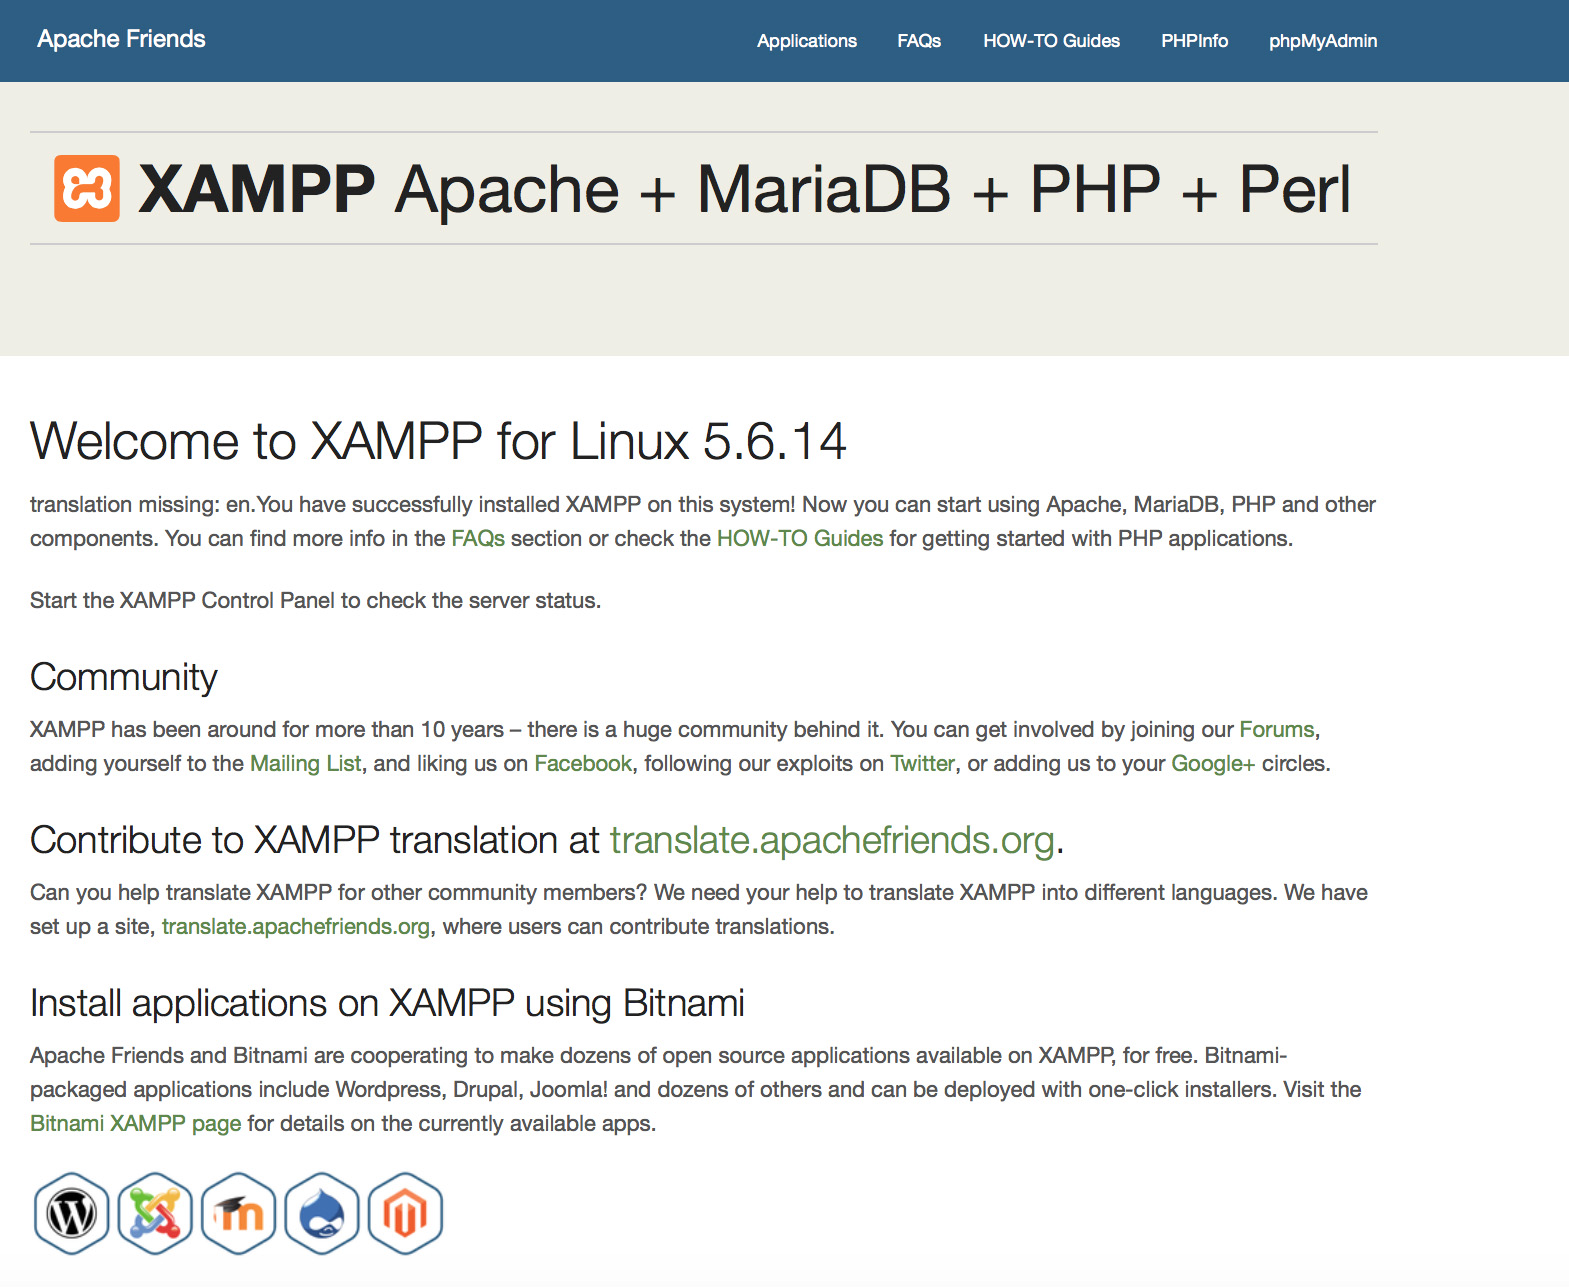
在你喜欢的浏览器中输入下面的链接:
http://localhostYou should see the XAMPP start page, as shown below.
- XAMPP准备好了吗?
-
XAMPP是一个非常优秀而又实用的开发测试环境,XAMPP的配置是开放的,允许开发者任意去修改或配置适合您的开发环境。XAMPP并非商业运行环境,用于商业运作将是一个致命的环境!
如下是XAMPP不安全的配置:
- MySQL数据库管理帐号 (root)没设置密码。
- MySQL数据库可以通过网络打开。
- ProFTPD uses the password "lampp" for user "daemon".
解决简单问题的安全命令:
sudo /opt/lampp/lampp security为了让您安装的XAMMP更安全即将启动一个安全检查过程,例如,这可以防止通过默认的用户名('lampp') 和默认的密码组合非法访问XAMPP的演示页面。
- 看到有XAMPP启动时的错误信息?
-
你可能会得到一些XAMPP启动错误信息
LAMPP-Apache is already running.

          An Apache daemon is already running.
由于另外一个Apache正在运行,所以没能成功启动XAMPP-Apache。如想正常启动XAMPP-Apache,先把另外一个Apache停止运行。
LAMPP-MySQL is already running.

          A MySQL daemon is already running.
这主要是由于和上述错误同样的原因,LAMPP启动脚本发现一个MySQL守护进程已经在你的系统上运行。要正确启动LAMPP,你必须先停止该守护进程。
- Apache doesn't seem to start. What can I do?
-
这个错误可能存在多种原因,Apache提示有多种错误的话,我们找出的错误:
tail -2 /opt/lampp/logs/error_log如果收到任何错误信息,请访问 %{社区} 寻求帮助。
- 如果错误信息是“Cannot restore segment prot after reloc: Permission denied?(重定位后无法恢复段保护:权限不足?)”我该怎么办?
-
有些Linux版本默认启动了SELinux,这会导致XAMPP无法成功启动。你应该关闭SELinux以启动XMAPP服务器:
sudo /usr/sbin/setenforce 0XAMMP现在应该重新工作正常了。
- 我重启我的Linux机器后,XAMPP不工作了!怎么修复?
-
正确。这是正常的Linux的行为(任何其它类Unix系统都会有类似的行为) 。这是管理员为确保一个特定的应用程序随操作系统启动应做的工作。
Linux操作系统的启动过程配置没有真正的标准方法,但是其中许多应该可以允许你通过下面的步骤确保XAMMP在系统启动后运行。
Debian, Ubuntu.
sudo ln -s /opt/lampp/lampp /etc/init.d/lampp
          sudo update-rc.d lampp start 80 2 3 4 5 . stop 30 0 1 6 .
RedHat, Fedora, CentOS. 如果你的Linux版本是使用“chkconfig”工具来安装服务的,你可以使用以下命令:
sudo ln -s /opt/lampp/lampp /etc/init.d/lampp

          sudo chkconfig --add lampp
SUSE
sudo ln -s /opt/lampp/lampp /etc/init.d/lampp sudo chkconfig lampp 2345 - 如何让XAMPP更安全?
-
默认安装时,XAMPP没有设置密码,但是我们不推荐这种可以被其他人访问的配置来运行XAMPP
只需(以root用户)输入以下命令就可以进行简单的安全检察:
sudo /opt/lampp/lampp security现在您应该可以在屏幕上看到如下对话框:
          XAMPP: Quick security check...
          XAMPP: MySQL is accessable via network.
          XAMPP: Normaly that's not recommended. Do you want me to turn it off? [yes] yes
          XAMPP: Turned off.
          XAMPP: Stopping MySQL...
          XAMPP: Starting MySQL...
          XAMPP: The MySQL/phpMyAdmin user pma has no password set!!!
          XAMPP: Do you want to set a password? [yes] yes
          XAMPP: Password: ******
          XAMPP: Password (again): ******
          XAMPP: Setting new MySQL pma password.
          XAMPP: Setting phpMyAdmin's pma password to the new one.
          XAMPP: MySQL has no root passwort set!!!
          XAMPP: Do you want to set a password? [yes] yes
          XAMPP: Write the passworde somewhere down to make sure you won't forget it!!!
          XAMPP: Password: ******
          XAMPP: Password (again): ******
          XAMPP: Setting new MySQL root password.
          XAMPP: Setting phpMyAdmin's root password to the new one.
          XAMPP: The FTP password for user 'nobody' is still set to 'lampp'.
          XAMPP: Do you want to change the password? [yes] yes
          XAMPP: Password: ******
          XAMPP: Password (again): ******
          XAMPP: Reload ProFTPD...
          XAMPP: Done.
(1)设置密码就会用这个密码来保护XAMPP演示的页面(http://localhost/xampp/)。用户名为‘lampp’!
通过调用这条命令您的XAMPP安装过程会更加安全。
- 我如何启用eAccelerator(e加速器)?
-
要启动eAccelerator(e加速器)只需在你的/opt/lampp/etc/php.ini配置文件中找到如下行:
;extension="eaccelerator.so" ;eaccelerator.shm_size="16" ;eaccelerator.cache_dir="/opt/lampp/tmp/eaccelerator" ;eaccelerator.enable="1" ;eaccelerator.optimizer="1" ;eaccelerator.check_mtime="1" ;eaccelerator.debug="0" ;eaccelerator.filter="" ;eaccelerator.shm_max="0" ;eaccelerator.shm_ttl="0" ;eaccelerator.shm_prune_period="0" ;eaccelerator.shm_only="0" ;eaccelerator.compress="1" ;eaccelerator.compress_level="9"删除每一行开始的分号,重启XAMPP。eAccelerator现在是活动的。想要获取更多关于eAccelerator的信息,请访问eAccelerator的主页:http://eaccelerator.net。
- 如何为PHP激活OCI8/Oracle扩展?
-
启动OCI8/Oracle的PHP扩展,请执行以下命令:
sudo /opt/lampp/lampp oci8下面的对话框就会启动:
Please enter the path to your Oracle or Instant Client installation:
          [/opt/lampp/lib/instantclient-11.2.0.3.0]
          installing symlinks...
          patching php.ini...
          OCI8 add-on activation likely successful.
          LAMPP: Stopping Apache with SSL...
          LAMPP: Starting Apache with SSL...
现在扩展程序将会激活。
- XAMPP运行了,但是为什么图片全都不能显示?
-
某些Linux系统会有这个特殊问题。请打开你的/opt/lampp/etc/httpd.conf配置文件,并且找到这两行:
#EnableMMAP off
          #EnableSendfile off
去掉#(井号),然后重启Apache。图片应该会显示出来。
- How do I enable access to phpMyAdmin from the outside?
-
In the basic configuration of XAMPP, phpMyAdmin is accessible only from the same host that XAMPP is running on, at http://127.0.0.1 or http://localhost.
IMPORTANT: Enabling external access for phpMyAdmin in production environments is a significant security risk. You are strongly advised to only allow access from localhost. A remote attacker could take advantage of any existing vulnerability for executing code or for modifying your data.
To enable remote access to phpMyAdmin, follow these steps:
- Edit the etc/extra/httpd-xampp.conf file in your XAMPP installation directory.
- Within this file, find the lines below.
Alias /phpmyadmin "/opt/lampp/phpmyadmin/" <Directory "/opt/lampp/phpmyadmin"> AllowOverride AuthConfig Require local - Then replace 'Require local' with 'Require all granted'.
- Restart the Apache server using the XAMPP control panel.
Alias /phpmyadmin "/opt/lampp/phpmyadmin/" <Directory "/opt/lampp/phpMyAdmin"> AllowOverride AuthConfig Require all granted - Where are the main XAMPP configuration files?
-
The main XAMPP configuration files are located as follows:
- Apache configuration file: /opt/lampp/etc/httpd.conf, /opt/lampp/etc/extra/httpd-xampp.conf
- PHP configuration file: /opt/lampp/etc/php.ini
- MySQL configuration file: /opt/lampp/etc/my.cnf
- ProFTPD configuration file: /opt/lampp/etc/proftpd.conf
- How do I send email with XAMPP?
-
To send email with XAMPP, use the PEAR Mail and Net_SMTP packages, which allow you to send email using an external SMTP account (such as a Gmail account). Follow these steps:
- Install the Mail and Net_SMTP PEAR modules:
pear install Net_SMTP MailNote that if these packages are already installed in your system you see the messages below when executing that command:Ignoring installed package pear/Net_SMTP Ignoring installed package pear/Mail Nothing to install -
Create the following example script in your "htdocs" directory to send an email:
          <?php
          require_once "Mail.php";

          $from = "your-gmail-username@gmail.com";
          $to = 'recipients@example.com';

          $host = "ssl://smtp.gmail.com";
          $port = "465";
          $username = 'your-gmail-username@gmail.com';
          $password = 'your-gmail-password';

          $subject = "test";
          $body = "test";

          $headers = array ('From' => $from, 'To' => $to,'Subject' => $subject);
          $smtp = Mail::factory('smtp',
             array ('host' => $host,
               'port' => $port,
               'auth' => true,
               'username' => $username,
               'password' => $password));

          $mail = $smtp->send($to, $headers, $body);

          if (PEAR::isError($mail)) {
            echo($mail->getMessage());
          } else {
            echo("Message successfully sent!\n");
          }
          ?>
Remember to replace the dummy values shown with your actual Gmail address and account password. If you don't plan to use Gmail's SMTP server, replace the SMTP host details with appropriate values for your organization or ISP's SMTP server.
- Execute the script by browsing to it using your Web browser. You should see a notification that the message was successfully sent, and the message should be delivered to the recipient email address.
- Install the Mail and Net_SMTP PEAR modules:
- 我如何备份/恢复我的XAMPP系统?
-
警告: 备份和恢复功能目前还处于开发阶段,所以目前可能还不能工作。
你可以通过调用如下命令来创建备份:
sudo /opt/lampp/lampp backup或
sudo /opt/lampp/lampp backup secret”secret“代表你的MySQL root密码。这行命令会产生以下输出:
Backing up databases...
          Backing up configuration, log and htdocs files...
          Calculating checksums...
          Building final backup file...
          Backup finished.
          Take care of /opt/lampp/backup/xampp-backup-22-01-14.sh
这个文件 /opt/lampp/backup/xampp-backup-22-01-14.sh (在上面的例子中)包含了你的备份数据。请将此文件保存至安全处。
在新机器上,你需要一个和你的最初/源机器上相同版本的AXMPP.
sudo sh xampp-backup-22-01-14.sh你会看到一些类似这样的东西:
Checking integrity of files...
          Restoring configuration, log and htdocs files...
          Checking versions...
          Installed: XAMPP 1.4.2
          Backup from: XAMPP 1.4.2
          Restoring MySQL databases...
          Restoring MySQL user databases...
          Backup complete. Have fun!
          You may need to restart XAMPP to complete the restore.
这样就可以了。记住那只是一个测试版本的功能。